How To: Inovativ Voyager EVO X-top shelf mod
There's many great things about the Inovativ Voyager cart but one aspect is a bit lacking. The top shelf.
While it's great "X-Top" shelf on the Voyager offers the option to remove one lip to offer easier use as a digital workstation, the panel has to be removed with tools and it just ends up being tossed in a closet and never used. It's not the end of the world but there's room for improvement. For example, Inovativ offers a hinged flip down lip on their Apollo cart. So why not to Voyager?
TLDR: I added a hinge and latches to a Inovativ Voyager 36 cart top shelf to make it more useful.
 |
| The flip down lip of the Apollo cart. Image by Inovativ |
 |
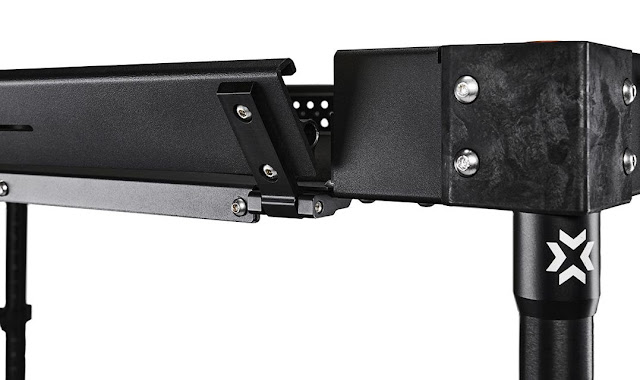
| Chris Cao's modified Voyager top shelf. |
This led me down a rabbit hole of trying to find the perfect solution for my own use and that I could share with others willing to do a little D.I.Y.. Approaching this project I had a few goals:
For the latches, it took some time to find just the right ones. I even toyed with the idea of designing latches that could be 3D printed to use the existing holes on the panel and shelf. Then, I found these. They are stainless steel which was something I wanted. I also wanted a spring loaded locking latch that's default position was to be engaged. With this, I wouldn't have to worry about the lip falling down if the latch became dis-engaged. Once mounted, you pull the ring to disengage then press the button to engage, simple and effective. It worked out that the female latch receivers (shown below) weren't needed in the final install which simplified the project.
- Not permanently modify the top shelf. (no drilling/tapping new holes)
- Clean install that looks as if it could be original.
- Quick locking latches.
- Lightweight.
- Corrosion resistant materials.
 | |
|
I checked my local hardware stores and online offerings looking at all sizes and shapes of hinges and concluded the best option would be a piano hinge (sometimes called a continuous hinge) I initially wanted it to be stainless steel but to keep it lightweight I went with aluminum. This choice also made it easier to modify later on. Measuring the cart I found that 1.5"(38mm) width would be perfect as the support bar under the shelf lip is .75"(19mm). I considered going full length with it but felt it would be unnecessary. I settled with 15.5"(394mm) to use 3 of the existing holes while still having enough hinge length for strength.
 |
| The perfect latches for this project. |
The latch in action.
After all the materials were sourced I went to work. It took about an hour and I couldn't be happier with the final result.
Materials used:
- 1.5" Aluminum Piano Hinge without Holes (later cut to size)
(m4 screws would be the metric substitute for #8-32)
Tools used:
- Drill
- Step drill (essential when drilling sheet metal)
- Hacksaw
- File
As far as step-by-step instructions go, I didn't take photos along the way but it's a fairly straight forward procedure. Here's what I did without going to deep into detail.
- Used double stick tape to temporarily mount the hinge to determine the correct length and placement.
- Remove it and cut the hinge to length (15.5"/394mm worked for the Voyager 36)
- Used masking tape to record these locations on the shelf and panel in case anything were to move. Then I transcribed the hole locations of the existing 1/4-20 screws on the shelf to the hinge and used the center punch to properly mark the holes to prevent the step bit from drifting.
- Mounted the hinge in place on the top shelf and determined the hole placement for the #8 screws on the top half of the hinge and panel and drilled those holes. You don't want this in line with the bottom screws as that will limit the angle in which the panel can open. (I used a total of 4 screws, 2@ 3/8"(10mm) from the edges and the other 2 were 6"(152mm) on center from those.) Then added the hardware.
- After the hinge was properly and securely mounted on the shelf and the panel was in place and I temporarily mounted the latches with double sided tape to verify they correct location. Then drilled the holes for the rivets, removed the tape and riveted the latches in place.
Here's the finished product:
This project was definitely worth the time. I really feel this should be an option offered for the Voyager EVO X carts. But, for around $40 in materials and an hour of your time you can do this also.
I'm glad I saw Chris's post on Instagram that inspired me to do this. If you do the same please share it by tagging @fainimade on Instagram!
----
A few extra notes:
I bought piano hinge without holes as their standard hole spacing is 2" on center. Because of that I 'd have to drill new holes to use the existing holes on the top shelf and it wouldn't look as clean. So it was better to just drill the holes needed.
I also bought a stainless steel hinge but found the aluminum to do the job while being lighter weight.
I also bought a stainless steel hinge but found the aluminum to do the job while being lighter weight.
I considered riveting the hinge to the flip down panel but went with nuts/screws in the event I want to change out the hinge at some point to the stainless steel.
For longer carts, two separate piano hinge segments ~1ft in length might be the way to go.


